- MENU
- HOME
- SEARCH
- WORLD
- MAIN
- AFRICA
- ASIA
- BALKANS
- EUROPE
- LATIN AMERICA
- MIDDLE EAST
- United Kingdom
- United States
- Argentina
- Australia
- Austria
- Benelux
- Brazil
- Canada
- China
- France
- Germany
- Greece
- Hungary
- India
- Indonesia
- Ireland
- Israel
- Italy
- Japan
- Korea
- Mexico
- New Zealand
- Pakistan
- Philippines
- Poland
- Russia
- South Africa
- Spain
- Taiwan
- Turkey
- USA
- BUSINESS
- WEALTH
- STOCKS
- TECH
- HEALTH
- LIFESTYLE
- ENTERTAINMENT
- SPORTS
- RSS
- iHaveNet.com: Home & Garden
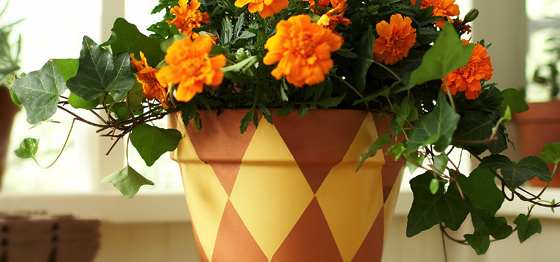
How to Paint Outdoor Pots
by Peter Walsh
Want to turn a terracotta pot into a colorful complement for your flowers? Follow these step-by-step instructions to create a charming harlequin flower pot
Potted flowers add interest and life both indoors and out, but you make them pop even more with this easy DIY paint idea.
Here's how to paint outdoor pots and add some extra charm to your flower displays.
Skill Level: Novice
Time: 24-48 hours (including primer, paint and polyurethane drying times)
Cost: Less than $50
Tools and Materials
- Norcal 10-inch terracotta flower pot
- Primer made for terracotta (or another appropriate primer, depending on the material of your pot)
- Measuring tape
- Pencil
- 1-inch painter's tape
- Hobby knife
- Paint brush
- Artist's brush
- Exterior paint or project paint
- Exterior water-based polyurethane (if using your pot outside)

Step No. 1
Prime the pot with a primer that is appropriate for the material of your pot.
Follow the instructions on the primer container. Once the primer has dried, create a harlequin pattern on your pot.
Draw the pattern in pencil using measuring tape, or you can purchase ready-made stencils in the paint department of your local home improvement or paint store.
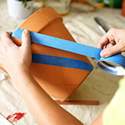
Step No. 2
Tape off the lines with painter's tape.
Trim off the excess tape with a hobby knife.
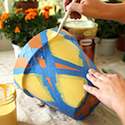
Step No. 3
With a paintbrush, paint over the tape to create your diamond pattern.
Don't use too much paint, though, or it will bleed through the tape.

Step No. 4
Once the paint is dry, switch the tape to the outside of the pattern, and then fill it in with an artist's brush.
Step No. 5
Simply remove the tape, touch up any imperfections and enjoy! If you plan to set the pot outside, seal it with water-based, exterior-grade polyurethane.
Use two or three coats for extra protection.
Peter Walsh is a NYC-based writer specializing in home and garden-related topics.
AUTOS | HOBBIES | EDUCATION | FAMILY | FASHION | FOOD & RECIPES | HOME DECOR | RELATIONSHIPS | PARENTING | PETS | TRAVEL | WOMEN
Article: Copyright ©,
Home & Garden: "How to Paint Outdoor Pots"